Picture
I came into this course with a broad understanding of instructional technology applications. Five weeks later, I am walking away from this class with specific ideas as to how a number of free online resources can be used to motivate students and enrich the middle school science and social studies curriculum. 

Overall, I am blessed to have signed up with Garth Holeman and experience this required course through with him as the instructor. He brought his experience and knowledge of pedagogy to the classroom and allowed us to explore, play, ask questions, and reflect on how every technology application could be implemented into our content areas.

The end result: this was one summer course that was NOT a waste of my time. I also took Evaluating Language Literacies this summer session and commented to my class/instructor some of the insights that I have gianed about technology in the classroom and inquiry learning. My instructor was so impressed that she requested the link for Teachers For Tomorrow

Without a doubt, this technology course proved to be sufficiently more effective than the course Educational Technology. Looking back on Edu Tech, I remember creating a digital graphic organizer, looking at virtual field trips, creating a mock grade book in Excel, and making a group presentation using a PowerPoint with added links to movie clips on the web. While all of these applications are used in the realm of education, there is SO much more available to teachers who are willing to try new things within their classroom! For example, if I had never taken this course with Garth, then I would possibly never have taken the time to create a blog. Garth said that if he wanted us to take anything away from this course, it would be the benefits and effectiveness of using blogs in the classroom. Mission accomplished! Keeping this blog as my personal reflection will serve me well throughout my student teaching and first several years in the field. Beides using this blog as a tool of reflection, I also plan on using it to record my two student teaching experiences. This way, I can upload videos, student Prezi presentations, motivational posters of my students, and other student work for future employers.

With every end comes a beginning, and the end of this course has brought me to the beginning of effective instructional technology applications. I am not ignorant to realize that this pedagogy will be challenging, but it is a challenge that I find necessary and crucial to the success of my future students.  


 
Picture
Screen Capturing allows you to take an image on the computer and put it with audio. There are many screen capturing software programs, but the two that we explored in class are Quick Time and Jing. 

Quick Time is the perfect choice if you already have a YouTube Channel. This is because you must have something to save your screen capturing video to prior its making, or else you will lose all of your data. However, if you do have a YouTube channel, then Quick Time is arguably the easiest screen capturing program to use. 

Jing is a free software program that allows up to 5 minutes of screen capturing/audio recording. Unlike Quick Time, it gives you a code so that you can embed your video on your webpage, blog, or wiki. Nice !!!!

How do I plan on using screen capturing in my middle school social studies and science classroom?

1.Students can work in groups or independently to create a screen caption video that reflects their comprehension of content. 
2. I think screen capturing is a great tool for teachers because it allows them to create tutorials for Flip Teaching where the students watch a video for homework and come to class the next ready ready to expand upon and practice the content.

Below is a video that tells the story of a teacher who uses Flipped Teaching, Check it out!


Picture
After creating a wiki account and free educational wiki space, I am writing this blog to document the technology and content standards and procedures of my lesson plan for this course.


Lesson Plan


Application
:Building a graphic organizer using bubbl.us and creating a Google Doc

Content Specific:
1. The Google Forms pre-test that I created titled "Guess Who?"
2. The graphic organizer using bubbl.us
3. The Google Doc

Standards:
Grade 7 Social Studies 
People in Societies
Benchmark C
4. Describe the cultural and scientific legacies of African, Greek, Roman, Chinese, Arab and European civilizations.
Social Studies Skills and Methods
Benchmark D
3. Establish guidelines, rules and time lines for group work.
4. Reflect on the performance of a classroom group in which one has participated including the contribution of each member in reaching group goals.
Grade 7 Technology
Nature of Technology
2. Describe ways that technological systems can be connected to one another.
Technology and Productivity Applications
Benchmark A
3. Explain the purpose and different functions of software programs.
Benchmark B
1. Solve problems using all available technologies for inquiry, investigation, analysis and presenting conclusions.
Becnhmark C
1. Use content-specific tools, software and simulations to support learning and research to create educational projects (e.g., aerodynamic model design, bridge building simulation, design tools, how-it-works Websites).

Telecommunication or collaboration
1. My wiki textbook at www.amk77.wikispaces.com
2. Graphic organizer using bubbl.us
3. Google Doc

Procedures:
1. Students go to their online Learning Station and complete the pre-test.
2. Students will be divided into six groups to study and research one of the six cultures listed in the above standard.
3. Using bubbl.us students work in their teams to create and complete a graphic organizer that reflects their assigned culture's cultural and scientific legacies.
4. After completing their graphic organizer, each team will embed their image onto the Learning Station.
5. Each team will create a Google Doc to write a paragraph that summarizes the main points of each culture's graphic organizer.
6. Students will print this Google Doc and bring to class for further discussion and activities.


Picture

Inquiry Learning
Training to be a middle school science and social studies teacher I have observed both inside and outside the classroom the benefits and drawbacks of inquiry learning. 

What is inquiry learning? Great question! It is the process of asking a question and seeking its truth. Unlike the scientific method, inquiry learning does not always fit into a sequential process; rather, the student has the opportunity to seek the knowledge however he or she see's best fit.  Inquiry learning is the foundation of some schools, such as the STEM schools. While meaningful learning is highly achieved through inquiry, some teachers may believe inquiry learning to be best practiced periodically rather than continually. 

Benefits
  • Students take ownership of their work, therefore developing responsibility
  • Students develop a genuine interest in their work
  • Students become motivated
  • Students create meaningful and enriching learning experiences

Drawbacks
  • Requires a higher teacher-to-student ratio
  • Time-consuming
  • Expensive short-term and long-term cost
For more information about Inquiry learning, visit Thirteen.org


How can I use inquiry learning in my classroom?
I plan on using inquiry learning in my classroom through problem-based learning strategies, such as WebQuests, Podcast, and Skype.

What is a WebQuest?
Watch the video below to find out, and/or click on the WebQuest link!

Picture
Podcast
A podcast is a simple digital recording of one's voice.  With podcast software, however, a teacher is able to record his/her voice and add images, websites, and music. Therefore, postcast gives educators a unique opportunity; to digitally take control of the classroom. That means lectures, group work assignments, research projects, and more!

How do I plan on using podcast in the classroom?
 When first learning about podcast I automatically imagined using this technology if I was ever absent from school. By doing so, I could leave behind my virtual self, rather than being completely absent from the classroom. As the result, I can lecture, instruct, and hold my students accountable for their work that would be due (turned into the sub, submitted online, or saved to a file). All of this is possible thanks to Podcasting! Another possibility; students can complete a Jigsaw activity and report the info via podcast, then share it with the class. Rather than just reading their notes about their informational findings, students can be much more creative with podcasting, making learning meaningful and fun!

Below is a simple example of a podcast made by my classroom buddy Ashley and me. There are supposed to be images included, but they are not showing up for some reason. This was my very first podcast. however, so I have much time for growth! (;

bergman_kleese.m4a
File Size: 1436 kb
File Type: m4a
Download File

Below is a video that discusses several other creative ways a teacher may use Podcast in the classroom. Take a look!
Picture
Skype
Skype is a software that enables FREE video calls! This also means free conference calls as well. 

How will I use Skype in my classroom?
Outside of the classroom, students can work together on an assignment via Google Docs and Skype; therefore, the students will never have to leave their home to work on a group project. 
In the classroom, I can Skype authors, museum manages from around the world, field experts, famous historians, politicians, teachers and students from around the world, and much more! With Skype, TRUE collaboration is made possible. It is time to start thinking outside of the box that the field of education has molded itself into. THINK BIG, and SEE THROUGH.


Today in class we learned about several websites online that provide fun digital content that can be adapted for the classroom.

Examples include the following:
1. Meet.com
2. Mosaickr.com
3. Cartoon Yourself
4. Prezi
5. Voki
6. Xtranormal.com
7. Goanimate.com/
8. Answergarden.ch/
9. Wallwisher

Digital content is a GREAT way to keep students motivated and change up the daily routine. It would not be beneficial or even appropriate to use any of these resources on a daily basis; however, implementing these tools on a weekly basis will keep the content alive and interesting, motivating my students to learn. 

In my classroom I plan on definitely using Wallwisher and Motivator.

With Wallwisher, students can leave me anonymous feedback or ask questions that were not asked during the school day. Therefore, I will embed Wallwisher onto my blog as another form of communication between me, my students, parents, and anyone else. 

Below: An example of a Wallwisher


With Motivator, I will be able to create posters of my students and match them with motivational text. To boost self-confidence, I will post them not only on my blog, but around my classroom. Another fun activity that my students can do is create their own motivational posters when doing a report on a person or a geographic location. 

Below are two examples of posters that I made myself.
Picture
Picture
 
Picture
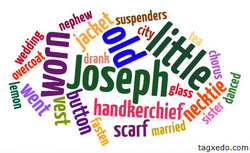
In the history of education, most teachers have either chosen or been limited to teaching via speech. Well, if you look to the left, you can see that a picture says, in this case, 24 words! This summer I am tutoring a child who is entering the first grade in the fall; tomorrow we will be reading Joseph Had a Little Overcoat and I am using this visual as a pre-reading activity. How did I create this? I used a word cloud via Tugxedo! It's simple; just click on the link and do one of either three options: 1. copy/paste a selection (such as the U.S. Constitution, a famous speech, newspaper article, etc); 2. enter in a website URL; 3. type in a paragraph, story, etc. Then, click "submit" and choose a theme and shape. 

Another website you can use to create word clouds is Wordle. The only difference between the two sites is that Tugxedo allows you to choose a shape for your image. Below is a slideshow of the images found on the website.

Other visuals that I will be using in the classroom include graphic organizers. While there are many free printable templates on the web that I can use, I can also create my own using Inspiration and Bubbl.us and Mywebspiration. Graphic organizer are EXCELLENT for during instructional activities that I will definitely implement into my middle school science and social studies lessons. 

This is your new blog post. Click here and start typing, or drag in elements from the top bar.
 
Picture
One component of education that is continually being encouraged is the idea of collaboration. 

While I was in elementary, middle, and high school, collaboration simple met working with a partner on a project or going on a field trip with a class from another grade level. As I have learned today, however, collaboration means much more. Quoting Garth Holeman from
Teachers For Tomorrow: "We need to start thinking big!" What does "big" mean? One look at the Teachers For Tomorrow website and you will begin to understand.

Google Docs
Today's class was all about Google Docs. If you have a g-mail account, you can use Google Docs. Interesting Facts: Its FREE and provides cloud computing, which virtually means an unlimited amount of storage space. If you're an educator, say (aloud or in your head) "Yippppie!" So how will using Google Docs help me develop collaboration?
Within Google Docs a person is able to simultaneously (and collaboratively) work on documents, presentations, spreadsheets, and forms without having to be in the same room, zip code, state, or country! Therefore, students can collaborate with experts virtually from anywhere in the world....all for free.

What are some ways I plan on using Google Docs?

Documents: Using the documents component I can collaborate with another science or social studies teacher to create homework, formative and sumative assessments. I can also have my students from different periods work together on an assignment.
The YouTube video below provides more examples as to how teachers in the U.S. implement Google Docs in their classroom
.


Presentations: Besides the obvious collaboration between different classes working on a presentation together, one idea that Garth shared with the class today made my ears jump: In the beginning of the year, my older science/social studies students can divide into groups and create a presentation that covers either 3rd, 4th, or 5th grade content. Then, as a class, we can Skype another school either in our district or elsewhere and share the presentations. What a creative way to review, create, and collaborate!

Forms: Looking for a quick and easy way to assess your students' comprehension? The forms components can be used to create pre-test, exit-slips, interest inventories, and more. Garth suggested having the school use the forms component for school events, such as school council elections. The really neat and useful aspect of using forms is the "summary response" option that tranfers all of the assessments into graphs. 
NOTE: When using the forms component, it is best sticking with multiple choice, check box, and one word ansers.
Below is my first assessment: